Alerts
Inigo supports the ability to generate real-time alerts of events with your GraphQL API such as errors. Additionally, Inigo supports exporting these alerts to Slack, with more integrations coming in the future.
The main use case for alerts is to provide notifications to GraphQL service admins to inform them of GraphQL query errors or critical metric thresholds being surpassed, such as rate limits.
Configuring Alerts
An Alerts configuration is used to define various alerts that will be triggered based on metric, threshold, window of time, and filters.
In the following example, an alert would be generated for the demo:dev Service when there are 5 errors within 2 minutes for a query operation named Login:
kind: Alerts
name: demo
label: prod
spec:
  alerts:
    - name: "login_errors"
      metric: calls
      window: 2m
      threshold: 5
      filters:
        operation_name: Login
        has_errors: true
In an Alerts configuration, an AlertsFilter must be defined under the filters property. Filters can be created for hash, status, operation_type, operation_name, client, has_errors, error, and tag. Please review the Alerts configuration doc for details.
Once the Alerts configuration YAML file is created, it can be applied using the inigo apply command.
Viewing Alert Events
When alerts are triggered, they will be logged in Inigo's top-level Events screen under the Service Category. By viewing these alert events, you will be able to verify that they are being properly generated.
Exporting Alerts to Slack
For each Inigo Service, an Export configuration can be created to configure notifications through Slack. For detailed instructions on setting up Slack integration, see Connect Slack to Inigo.
Viewing Alerts in Slack
After the Alerts configuration is applied, and the flow to set up the Slack integration is completed, alerts will be exported the configured Slack channel as shown in Figure 7.
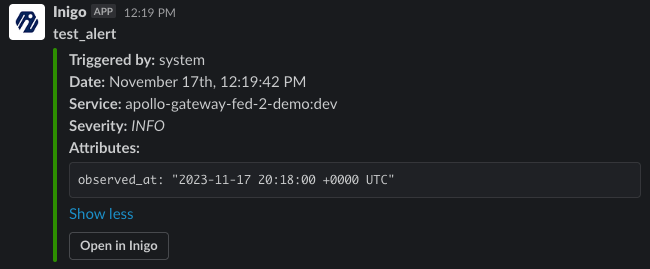
Figure 7. An example of an alert in Slack.